Thursday, March 31, 2016

Garden hacks to extend the growing season

The growing season around Madison is a mere 140 days (our grad school town, Raleigh, NC, gets 220 days). I have proposed moving to a warmer climate and have gotten the evil eye from my family. We do really love it here--even the snowy winters are a big draw for us. But I do need more time!

One problem I am currently dealing with is that it's time to plant tomatoes indoors and I am running out of room under my grow lights. I have a whole flat of lettuce that needs to move out to make room for my valuable tomato seedlings. After much reading this winter, I found some options for extending my season, and with these farm additions I can move some plants out and even start seeds outdoors now and could be harvesting cold-loving crops earlier in the spring and then again until Thanksgiving or later. Of course a heated greenhouse is ideal for growing year-round, but these are some easy, inexpensive options I'm trying out this year.


Cold Frame

A cold frame can be used for hardening off plants early in the year and growing veggies late into the fall. This project took a few hours, but other than buying the hinges, I was able to repurpose wood and other leftover supplies from my garage.

My new cold frame is built out of scrap wood and a used greenhouse panel (another option for the top would be an old window). To finish this frame, I'm going to paint the inside white to help reflect sunlight.

The plan for the cold frame was found in this book.

A thermometer helps monitor the environment inside the cold frame, since temperatures can really heat up on even a very cool but sunny day.


I placed the cold frame in a sunny spot facing south. When nights get really chilly this spring, my plan is to cover the cold frame with an old blanket and place a jug of hot water in the frame with the plants to slow the temperature drop overnight.


Hoop House

After building the cold frame, I decided to try additional cold weather growing options and see which ones worked best. According to the UW Extension, a hoop house can extend the growing season by 6-8 weeks, and I've noticed that most of the CSA farms around use them. My goal for the hoop house is to grow cool season veggies early in the spring (and then later in the fall), specifically the fresh spinach and salad greens I've been craving.

After I worried for several days about how to do it (I winged it since I didn't have written instructions for my specific plan) it turned out to be one of the easiest garden modifications I've made. The new hoop house sits over one of my 4' x 8' beds, and when the spring heats up it can be easily removed and stored away until fall.

The simple frame consists of 4 PVC pipes. The ground is soft right now, so I was able to drive them into the ground inside of the raised bed for stability. I made three hoops and used one across the top, and all of these were zip tied together. I also used wood stakes (two on each end) to add stability and keep the hoop house upright.

Hoops over the raised bed.

I found the plastic at my local farmer's co-op.

This is a temporary structure, so rocks hold down the plastic sheeting.

When the day heats up, the cover is easily rolled up and clipped.

Row Cover

Another trick I'm trying is row cover, which should provide protection down to 28F. I'm going to plant early in the community garden, and the row cover should hopefully provide some protection not only from cold weather, but also from hungry bunnies and birds. For early season crops like salad greens, the cover can be left on the plants 24/7 through harvest, which is a big bonus since I don't make it out the community garden every day. For especially cold nights, the row cover can also be used inside of the hoop house to add a second layer of protection.


Be sure to shop around. Prices vary widely depending on where you shop.


Thursday, March 24, 2016

No time, no space

It has been really fun to talk with people about my urban farm. Friends and neighbors have had a ton of interesting questions and ideas, and they have all been super supportive of my small patch of country in the middle of town (hopefully they don't think about The Settlers commercial when they think of me!).


No, thanks
Several people have expressed an interest in starting a garden, but there are obstacles standing in the way between some of these friends and fresh fruits and veggies:

  • lack of yard space for a garden
  • fear of soil contamination in urban areas
  • lack of time for all that weeding while working a full time job and/or parenting

What are some options for getting local produce?

Community gardens-- find one, get on the list. In some areas (like Madison) community gardens are plentiful. It may take a little digging around, however, since some gardens can have waiting lists while others will have open plots this summer (my current community garden has available space). Also, some apartment communities have plots for their tenants. If you don't have any local gardens or they are full, a good option for the go-getter is to create a new community garden. Churches or schools are good places to start. Another option is renting from a land owner. I noticed recently that a farm close to our local dog park rents small garden plots. A free option is borrowing land from a neighbor or friend-- you could propose to plant and work the gardens together or you could do all the work and share part of your harvest as a thank you for the space.


My community's garden, Bock Garden

Raised beds, hoop houses, greenhouses-- if you're concerned about your soil, a soil test (such as this one that tests for lead) can help you find out if you have soil contamination. Raised beds can be used to avoid the city soil all together, and you can even set them on concrete if you don't have a yard.

Photo from nonabrooklyn.com

Another option is building raised beds inside a greenhouse or hoop house. Hoop houses can be inexpensive to build, and these "indoor" options will extend your growing season, which is especially important in locations with short summers (this blog is a great example of growing under cover).

image
A cool hoop house with raised beds from the blog Greenhouse to Table

CSA option-- if time is an issue, you can do small, easy things like growing herbs or microgreens in your windowsill and, of course, frequenting your local farmer's market. But the way to get a full summer's worth of garden goodness at a fair price is to join a local CSA (community supported agriculture). CSAs offer a subscription service with one price for a season's worth of vegetables, and sometimes fruits, eggs, honey, or meat. The produce is local, sustainable, often organic, and you are supporting a local farmer. In some cases you can get CSA discounts through health insurance or your workplace.

Have fun planning out how to grow, buy, and eat all your summer veggies!

Friday, March 18, 2016

Winter on the urban farm

Spring will be here in just a few days, so I have been contemplating winter. When I was working a desk job and dreaming of my future life on the urban farm, a couple of thoughts nagged at me: what would I do with myself all winter and would I go crazy? Sitting around my living room day after day is not my idea of a good time. I like to be busy and physically active. Now that I have a month of winter farming under my belt, I have a better picture of what next winter will look like.

So what do urban farmers do in the winter?

Winter in Wisconsin.

Planning: winter is a good time to go to your office (in my case that would be riding my fat bike through the snow to the local coffee shop) to plan for next year.

My winter office.

During the growing season and at harvest I make notes of what crops did well. This will help me decide what varieties to keep and which to replace. I also have planting maps from each year, so I can work on the next season's rotation and companion plantings. Since Two Wheels Urban Farm is in the growth stage, winter can be spent mapping out where new raised beds and other new farm additions will go and estimating supplies and budget needs.

One map iteration from my big farm notebook.

Education: there is always so much to learn! Which soil amendments are best, how can I make compost faster, and how difficult is it to raise my own chickens?  The winter provides cold weather and short days, just right for camping out at the library and reading. There are also many options for conferences and classes. This year I attended the 2016 Gardens Summit in Madison and learned about veggies, pollinators and composting while networking with local growers. There is a free online conference called the Home Grown Food Summit, and next year I'm planning to attend the 2017 MOSES (Midwest Organic and Sustainable Education Service) farming conference. I'm also currently finishing up a women's bicycle maintenance class called We Are All Mechanics-- I'm thinking Park Tool School might have my next bike repair class.

I keep re-checking out this book and should probably buy a copy for myself.

Volunteering: another important way I spend my free time is to volunteer. The winter is the perfect time of year for me to slow down and give back to the community. This year I've volunteered for three organizations that mean a lot to me: Fair Share CSA Coalition, Wisconsin Bike Federation, and the Madison Area Master Gardeners Association.

A cool sign from the Fair Share CSA open house.

I'm going to enjoy these last days of winter and start making my spring to-do list... continue indoor seed starts, fence building, prepping the beds at the community garden plot, and harvesting asparagus!

Monday, March 14, 2016

Expanding veggie production

Because of my small piece of land, I plant my annual vegetables very densely, giving each plant exactly the space it needs and no more. I was inspired by the book All New Square Foot Gardening by Mel Bartholomew, and after learning about his method I was really excited about minimizing footprint while maximizing harvest.

When building raised beds, any size works, though narrow boxes work better so you can reach into the middle without stepping into the bed. These beds are just boxes that can be created with anything: wood, cinder blocks, rocks, or bricks, with the main concern being to use something that will not leach toxins.


Boxes are simple and can be made of any safe material.
The potting soil mix in the square foot gardening book (1/3 compost, 1/3 peat moss, and 1/3 vermiculite) is high in nutrients, drains very well, and is light for easy weeding. My original boxes were built to these specifications and have done well in past years.

Plants growing happily in a box, summer 2014.
For my 2016 boxes, I have two types of new boxes: 4' x 4' boxes and 4' x 8' boxes. The 4' x 4' boxes are pre-owned, pre-fab kits that a very generous friend gave me, and they are made out of a composite material (something like this). Two of the new 4' x 8' boxes are made from new, non-treated cedar boards, and the last new 4' x 8' box is made from repurposed 4" x 4" cedar posts. I attached the boards together using self-tapping deck screws, so I didn't need to pre-drill.

For the soil mix I ordered two square yards of Purple Cow Organics compost from a local store, which turned out to be just right for the new boxes and left a small amount to mix into each of the old boxes--a big shout out to my father who spent a whole day helping me shovel and haul the pile off of the driveway! I also bought bags of peat moss at my local garden store and deviated from the original mix by not adding the vermiculite, which I will likely mix in to the new beds before planting.

Peat moss is a non-renewable resource. I am investigating alternatives for future raised beds.

In the new 4' x 4' boxes I used old coffee burlap bags as a weed barrier. For the 4' x 8' boxes I decided to do something different-- I put down a layer of wet newspaper.

This moist layer should attract worms to my box as well as discourage weeds for the first season. Eventually the newspaper will be incorporated into the soil and I will be able to use these boxes for deep-rooted veggies.


Annual vegetable bed expansion history:
  • 2012: 64 sq  ft of raised beds
  • 2015: 88 sq ft of raised beds + 200 sq ft community garden plot                                             
  • 2016: 216 sq ft of raised beds + 200 sq ft community garden plot

Two of the new 4' x 8' boxes on the left. New 4' x 4' boxes at the bottom.


Monday, March 7, 2016

Showing the raspberries who's boss

Raspberries were the first crop I grew successfully. When we first moved to Wisconsin, our city house in Madison had a very tiny yard. I tried that first summer to grow a garden, but it didn't produce anything but a nest of wild bunnies. (Looking back on it, my garden patch was much too shady to grow tomatoes in a cool Wisconsin summer.)

The next year I decided to try my luck at fruits and took a trip to the local garden center to buy bareroot blueberry plants. My mind was set on baking blueberry muffins. The helpful garden pro convinced me that it would be a huge mistake to plant blueberries in my part of the state. Although I hadn't had a soil test, she assured me that all of the soil around the county is very alkaline, and I would spend too much time and money modifying my soil to make it acidic. She pointed me to my future friend, the raspberry.

At the time, however, I associated raspberries with chocolate (usually raspberry syrup on some overly sweet chocolate cake). I didn't much like these fruits and was sad to lose my dream of blueberries. But I took home 6 bareroot plants anyway, assuming they would die like my first year's garden, and I planted them in the sunniest spot in the yard along the fence line and mostly ignored them.

By the second summer they were 3 feet wide and growing into the neighbors yard across the fence. By the third summer they were out of control, and I used the lawn mower to keep down the new sprouts. The plants produced a good crop of berries those third and fourth years-- enough for lots of fresh handfuls eaten right from the garden, many breakfast fruit salads, and several gallons to store. I learned how to freeze and use them in many wonderful recipes.


Fast forward a few years to our current house with a nice sized plot of land, and my raspberries were haphazardly planted in the middle of the yard. Truth be told, I planted them in a circle around an old satelite dish in an attempt to hide it. (We have since come to our senses dug out the offending dish.)

But once again the berries were a disaster. They were in a circle and hard to pick. I wanted them to spread (more berries!) but this messy circle patch was not going to work!


I consulted several online university extension sites and found a cheap and easy trellis plan from the University of Colorado.

I cut back the raspberries into two distinct rows, which was not as difficult to do with a circle of plants as I thought. As new shoots come up, I will keep the ones that are in the correct row location and cut back any that are out of place.

Brief safety message: before I did any digging I had the utility lines marked. My lot has underground wires running all over the place.


Two stakes and two wires per row make up my simple trellis system. I used bread ties to attach the canes to the wires. 


Once they were all tied up, I applied some organic, time-released fertilizer and spread on a thick layer of mulch. This fall I will add a healthy layer of compost and add mulch one more time.


Now I sit and wait for the buds to open and my plants to come back to life. I'm looking forward to a good harvest this summer and a freezer full of berries for next winter!

Thursday, March 3, 2016

Spring is getting real around here

Ok, I admit there are still several inches of snow on the ground, but now is the time to start thinking about planting (actually, the summer veggie growing season started about 2 weeks ago!). In my first years of gardening I made the mistake of waiting until the first warm, sunny, true spring day (probably mid-May here in Wisconsin) to decide to plant. Because I was so late getting started, I hurried to the home and garden store, or worse, a big box home improvement store, to buy whatever veggie plants they had left over (since everyone else in town suddenly also had spring fever-- it is highly contagious). The veggie plants I bought were expensive and likely not the ideal varieties for my region. For this farmer who loves a little thrill, they were probably also very boring varieties. Pick up any seed catalog and you'll see just how many fun options you have.

Fast forward a few seasons... this year I am continuing a system I started last year:
  • buy seeds early
  • for long-season crops, plant them indoors on time 
  • transplant or direct seed outdoors as early as possible
These practices allow me to not only plant unique or delicious varieties that will grow well in Wisconsin, but by planting early I can extend my growing season and maximize on my rotations (early crops, mid/late season crops, and fall crops).

Right now my system is not so fancy: shelves in a bright, southern window with a few grow lights hung to provide extra light in the morning and evenings. In the future I want to build one of these babies:


But for now, I'll work with what I have. I started some onions two weeks ago (in the back) and my current batch of microgreens (in the front):


I ran across the very handy University of Wisconsin's regional planting guide (starting on page 5) that lets me know when to start different plants indoors and outdoors. It is fantastic and I'm not sure how I grew vegetables without it. I would guess most locations have a similar resource (in the US, a good first step would be to check with your local university extension agent).

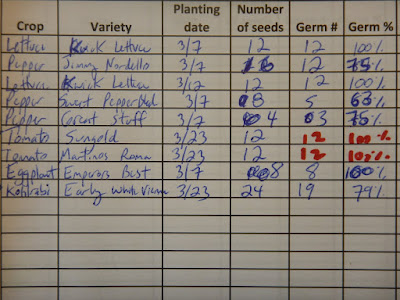
For the second year in a row I am also writing down the varieties I grow, how many seeds I start, and what the germination percentage is. This is helpful for next year to know how much to plant and whether I should plant extra seeds to get the desired number of plants. Some notes from 2015:


I'm also trying out the kindergarten thrifty urban farmer paper cup method of starting seeds. I may need to transfer them to larger pots at some point, but I know some seeds won't germinate, and some plants will germinate that I won't need, and so this is a very cheap and easy way to get things started.


So March is here and my first year of urban farming full time is off to a good start! I planted those onions on Valentine's Day, and today I started the peppers and eggplant. And although fat biking on the local pond is a ton of fun, I am ready for the snow to melt!